
I finally managed to track down a used Conectix black and white wecam on E-bay and after a few weeks I was testing and tweaking to my hearts content. I quickly realized I was going to need some sort of box to put this thing in so it would After rummaging around some old computer equipment at the office I came across an old IBM PS/2 mouse. Hey, the dimensions were right… Its really light, the hole at the bottom seemed the right size… Well why the heck not?? As it turns out the hole on the bottom where the mouse ball goes in is the exact size of a 35mm film canister. I had to break off and sand down the plastic that held the ball cover in place. Not too much as I was going for a tight fit. If fact the fit turned out to be so good that I didn’t even bother to glue the canister in place. I had a laugh when I discovered that the IBM mouse’s guts were made by Logitech. How ironic… (Conectix was bought by Logitech.) On the inside of the mouse the Conecix PCB fits perfectly and the cable is about the same size as the old mouse cable so I could use the plastic guider and retainer that was already part of the mouse housing. To hold the wecam board in place first I made an outline with an permanent marker of where I wanted it to stay, and eyeballed more or less the best places for the screws to go and marked them as well. Then I took one of the thicker type paper clips and heated up with a lighter and melted guide holes through the marks I had made. For the bolts, I ransacked a couple of old serial cables. The type that go from the mother board and end in a 9 or 25 pin D connector on the computer box where you plug in your mouse or modem or whatever usually have a hex-nut that is the perfect size for this job. I removed the hex nut with the screw and the little bolt on the inner side of the 9 pin connector and used the hex nut on the inside of the mouse and the bolt on the under side to tighten it in place. The Conecix board is held in place by a strip of plastic I cut out of an old QIC-80 tape And here’s a bottom view of the finished product. It is very easy to align the CCD to Eventually I’m going to try to setup a computer fan on the other side of the mouse so I can cool my… MouseCam! One great thing I discovered is that since the ccd chip is much closer to the eyepiece Hey! Whats that on your OTA?!? If nothing else a mouse hanging off the back of your telescope does attract a lot of attention. My father and I had a laugh at how ridiculous the thing looks on the LX50. But, hey… Its works! Check my astro gallery for images taken with modified webams like this one: http://astroturtle.com/imaging/ |  |
 | |
 | |
 | |
 | |
 |
Webcam Mods & Tips
MouseCam – Conectix QuickCam Mods
Converting a WebCam for Astrophotography
The method described here works for most “ball” cameras. Mainly for the old Connectix (now Logitech), and QuickCam VC type. Don’t forget that this sort of fun and games will pretty much void your warranty, and if you kill your webcam by mistake in the process, then that’s it. Get a new one… |
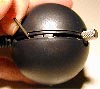
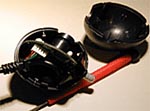
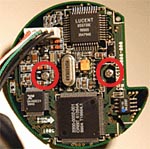
The Logitech and Connectix webcams all have a small hole on the bottom. Sometimes it is hidden under a sticker, but its there. If you stick a small screwdriver or even a paper clip into this and twist to on side the the 2 plastic shells that house the circuitry should pop open into 2 halves. Remember not to force it, if you do this right, the plastic shells will click back together like new. Even if you break the plastic tabs inside, (like me!), don’t worry. Usually the whole thing will stay together anyway. If not a loop of tape around the ball will do the trick. Once you’ve got the webcam open take a look and try to remember where everything fits, as some of these little buggers can be a bit of a puzzle to put back together. Pull out the guts of your webcam an take a look at the circuit board. On the lens side you’ll have the lens and the lens housing attached. On the back side you will see the 2 screws that hold the housing in place (2nd image on right, circled in red). You will need to unscrew these with one of those really small screwdrivers the Swiss usually reserve for watches. 🙂 Once you have the lens housing off, unthread the lens from the holder and look inside. You’ll see a small piece of blueish glass. This is an infrared filter. If you want to see something neat, point a TV remote at the webcam and press a button when its completely assembled (i.e.: before you did all this crap to it!) You’ll see the LED’s light up on the capture application. When you remove this filter the webcam becomes even more sensitive to the IR range of the spectrum. If you’re using a refractor this might not be a great idea as IR light tends to be slightly out of focus in achromatic refractors. On the other hand it is one less piece of glass in the way and makes the camera slightly more light sensitive. Experimentation and judgment are the best policy here. Tip: I like to keep those 2 screws in the housing. I drop them in there and thread the lens back on. Its a nice, safe place to keep from loosing them! | 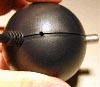 |
 | |
 | |
 | |
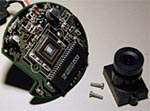 |
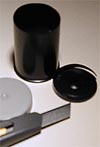
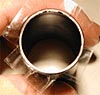
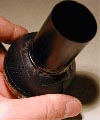
| Now you reassemble the webcam. Looking down the front you should see the exposed CCD as in the first image below. If the housing is having some trouble sticking together (very rare) just wrap some tape around it. Be careful of the series of small holes in the plastic on either side of the webcam. Try not to cover these with tape, as the let some air into the CCD and the circuitry. Next you’ll need a 35mm film canister. The black Kodak type are best. It turns out that the film tube is about 1.24″ in diameter, and fits perfectly into standard 1.25″ eyepiece holder. You’ll need a descent x-acto knife to cut off the sealed end of the tube and trim it so its as flat as possible. I like to keep the end with the “bump” around the rim, (the end the cap fits on), turned towards the webcam as otherwise it would bump against the lock screw on eyepiece holder. The easiest way to tape the tube onto the webcam is to wrap some tape all around the bottom of tube so its half on, half off, and then make slits in the tape so you’re left with 4 equal parts. Then you fold them out so your film tube looks like the 3rd image below. Now comes one of the tricky parts: Do your best to get the tube as in line as possible with the CCD. This is a trial and error thing. No way around it. But once its lined up to your satisfaction press the tape down onto the camera body to hold it in place. Now you’re going to want to wrap a LOAD of tape around the ex-film tube / webcam body. The whole weight of the webcam, plus any accidental pulls and tugs on the cable are going to be resting on this tape so, take it from me: Don’t be stingy! Tip: Over whatever tape you use, place some black electrical tape. This cuts down on stray light entering the tube. I don’t like to use just electrical tape as it doesn’t seem to do a good a job at holding things together. Maybe its the tape I use… 😉 Tip: Paint the inside of the film tube with some matte black model airplane paint or use some black construction paper to line it. The inside of these film tubes are usually very shiny. This causes some wild reflections when doing lunar photography. | 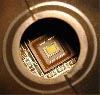 | ||||
 | |||||
 | |||||
 | |||||
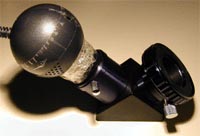 | Completely assembled your webcam should now look something like the one pictured here inserted into the standard Meade 1.25″ Star Diagonal. Although I have seen better methods listed at QCUIAG and other websites, I especially liked this one as it is a completely reversible process. Check my astro gallery for images taken with modified webams like this one: |