
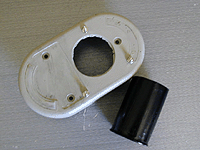
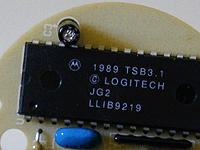
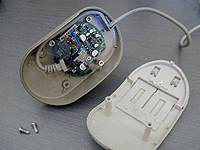
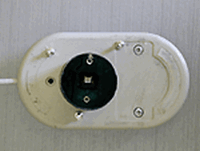
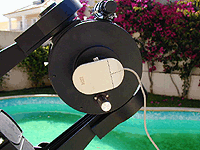
I finally managed to track down a used Conectix black and white wecam on E-bay and after a few weeks I was testing and tweaking to my hearts content. I quickly realized I was going to need some sort of box to put this thing in so it would After rummaging around some old computer equipment at the office I came across an old IBM PS/2 mouse. Hey, the dimensions were right… Its really light, the hole at the bottom seemed the right size… Well why the heck not?? As it turns out the hole on the bottom where the mouse ball goes in is the exact size of a 35mm film canister. I had to break off and sand down the plastic that held the ball cover in place. Not too much as I was going for a tight fit. If fact the fit turned out to be so good that I didn’t even bother to glue the canister in place. I had a laugh when I discovered that the IBM mouse’s guts were made by Logitech. How ironic… (Conectix was bought by Logitech.) On the inside of the mouse the Conecix PCB fits perfectly and the cable is about the same size as the old mouse cable so I could use the plastic guider and retainer that was already part of the mouse housing. To hold the wecam board in place first I made an outline with an permanent marker of where I wanted it to stay, and eyeballed more or less the best places for the screws to go and marked them as well. Then I took one of the thicker type paper clips and heated up with a lighter and melted guide holes through the marks I had made. For the bolts, I ransacked a couple of old serial cables. The type that go from the mother board and end in a 9 or 25 pin D connector on the computer box where you plug in your mouse or modem or whatever usually have a hex-nut that is the perfect size for this job. I removed the hex nut with the screw and the little bolt on the inner side of the 9 pin connector and used the hex nut on the inside of the mouse and the bolt on the under side to tighten it in place. The Conecix board is held in place by a strip of plastic I cut out of an old QIC-80 tape And here’s a bottom view of the finished product. It is very easy to align the CCD to Eventually I’m going to try to setup a computer fan on the other side of the mouse so I can cool my… MouseCam! One great thing I discovered is that since the ccd chip is much closer to the eyepiece Hey! Whats that on your OTA?!? If nothing else a mouse hanging off the back of your telescope does attract a lot of attention. My father and I had a laugh at how ridiculous the thing looks on the LX50. But, hey… Its works! Check my astro gallery for images taken with modified webams like this one: http://astroturtle.com/imaging/ | 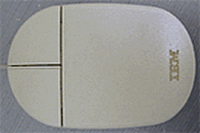 |
 | |
 | |
 | |
 | |
 |
Recent Posts
Copyright © 1996-2010 astroturtle. All rights reserved.