April 13 2003 update: Due to, among other things, time constraints and a brand-spanking-new MX7C, this autoguider is pretty much an abandoned project. Which isn’t to say that I won’t give folks a hand if they need it. I have some goodies that may be of help or at least a starting point for this project. This is page will hopefully help some out there build the CCD Cookbook based autoguider circuit and provide some background on how to connect one to an LX50. First of all I want to thank a good friend of mine, Michael McNeil over at http://www.caltel.com/~cno [on http://web.archive.org] for all the help and great advice. This is really his baby as he put the board together for me leaving my limited knowledge of electronics to work out how to connect the thing to my LX50. Even then a good number of e-mails went back and forth reflecting on the pro’s and con’s of 74LS14’s… Sheesh!! :o) This autoguider is an update of the version available in the CCD Cookbook which is based on the AY-3-1015D chip that is no longer in production and getting harder to find. The guider will work with the CB211 and CB245’s as well as with the old Connectix black and white parallel port quickcams thanks to Martin Niemi’s great autoguider software. Here’s a link to Marty’s page [on http://web.archive.org]: http://www.ameritech.net/users/mniemi000/auto.html To the Cookbook autoguider page: |
| Here are a couple of shots of Mike’s handy work. Component side and solder side. Everything was setup on a Radio Shack breadboard. Mike marked up the board with instructions even I can understand… | |
 |  |
| The box is just a regular plastic project box you can pick up at any electronic components shop. I chose plastic simply because I find it much easier to work with. All the holes in the box top were made first by melting away more or less the size I needed with a hot soldering iron and then just cutting and filing to a perfect fit. | |
 |  |
I cut some foam for the top and bottom of the box. When the box is sealed it’s a snug fit and the foam holds everything in place. Here is the finished product hooked up and powered on! I really like the box I put together for this thing. Its solid, there are no bits falling off (thank goodness for glue guns!), and all the cables come off the thing to facilitate storage. | |
This is the pinout for the LX50 Autoguider port. The orientation is as if you were looking at the LX50 panel straight on. The best thing to do is just to get a ready made cable that is wired straight through. You need a 6 pin RJ-12 plug. The pin numbering on these plugs is read from left to right (duh) with the plug held ‘upside down’. That means the little plastic flange that locks the plug is pointed at the ground, the embedded contacts are pointing up and the side the cable goes in is pointing towards you. |  |
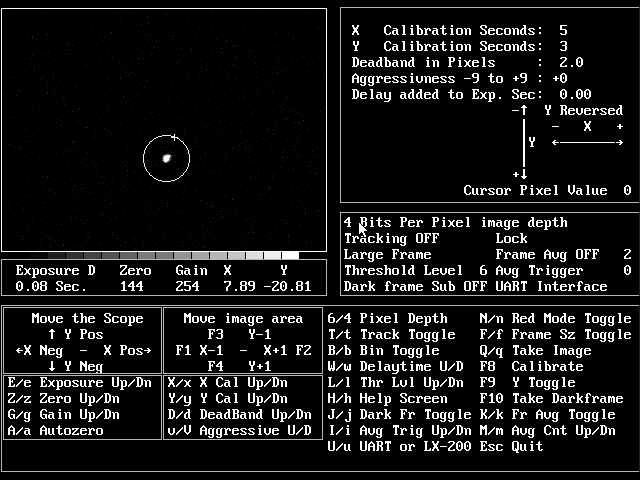
Here’s a screen shot from Marty’s program in action. One thing that had me confused the first night out is that if the guide star is too bright the program won’t lock on it. I was using a bright star just to make life easier but I eventually chose a dimmer star and threw my Hartmann mask on the scope for good measure and everything went great from there. In my case, the calibration routine threw the guide star right off the frame in the Y-axis the first couple of times. Try, try again and start the calibration with the guide star as close to center as possible! |


